

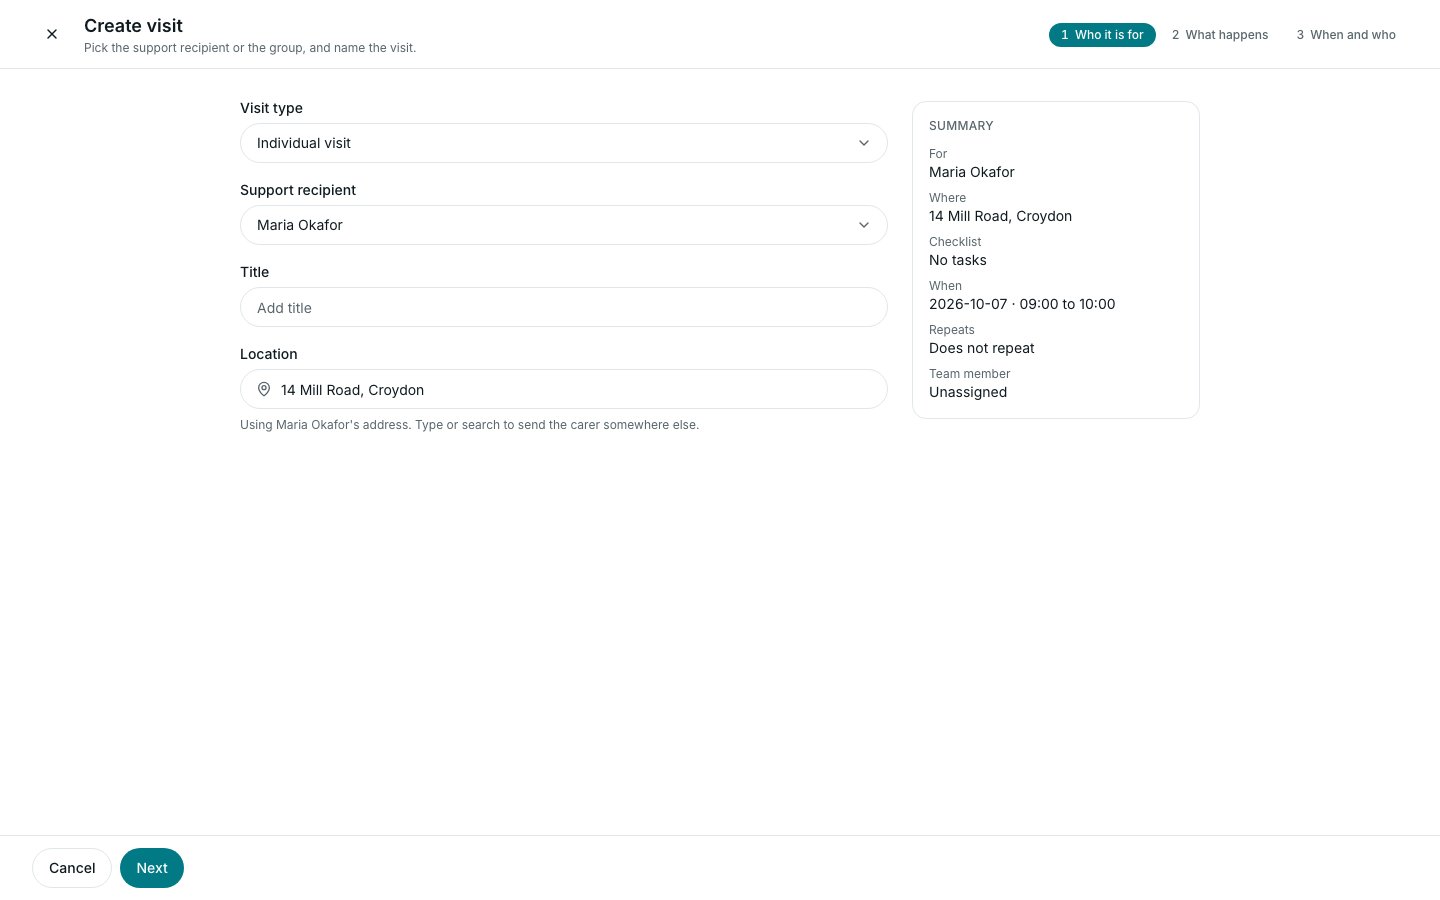
Create a visit
1
Open the form
In Schedule, select Create visit. The form opens as a full page in three steps. You can also drag across an empty slot in the Day or Week view, which fills in the time (and the person, if you dragged in their column).
2
Who it is for
Leave Visit type on Individual visit and choose the Support recipient. Add a Title if you want one; if you leave it blank, Elate names the visit after the person. Location shows the person’s address. Type or search to send the carer somewhere else for this visit. To go back to the person’s address, select Use (name)‘s address. Select Next.
3
What happens
Pick the packages and tasks the carer will tick off on this visit. You can leave it empty, and the visit starts with no checklist. Select Next.
4
When and who
Set When: the date, the start time and the end time. An end time earlier than the start runs into the next day. Leave Repeats on Does not repeat for a one-off visit (see Repeating visits). Choose the Team member, or leave it on Unassigned. Tick Handover required if the carer must leave a handover for the next visit.
5
Save
Select Create visit. Elate shows Visit created and takes you back to the schedule.
Choosing the team member
The Team member picker ranks your team for this time slot, using who has seen this person before, availability, skills and travel. It lists Unassigned first, then Best match, Good fit, Available and Unavailable. Point at the information icon beside Sort to see how the groups are decided. Each name carries short reasons, for example Preferred carer, New to this person, Has the required skill, Overlaps 1 visit, On approved leave, or how many minutes they are from their previous visit. Use Sort to switch between Best match first, Name A to Z and Name Z to A. Nobody is hidden or blocked: you can still choose someone in Unavailable. After you save, Elate may show a Conflict warning (the team member already has an overlapping visit) or a Compliance warning (their DBS or training has expired). The visit is saved either way.Create a group session
A group session books everyone in a group at the same time, for example a day centre session.1
Choose Group session
In Create visit, set Visit type to Group session and choose the Group. Each group shows how many people are in it. Groups are set up in Settings > Groups (see Groups and offices).
2
Pick the checklist
Everyone in the session gets the same checklist, so you can only pick organisation-wide tasks and packages. To add something for one person only, open their own visit afterwards.
3
Set the time and team member
Set When, Repeats and the Team member, as for a single visit.
4
Save
Select Create group session (or Create repeating group sessions if it repeats).
Edit a visit
1
Open the visit
Select the visit on the schedule to open the visit sheet.
2
Select Edit visit
Edit visit is at the bottom of the sheet. It is not shown on a completed or cancelled visit.
3
Make your changes
Change the Title, When, Team member, Location or Handover required. For a repeating visit you can also change Repeats.
4
Save
Select Save changes. For a one-off visit, Elate shows Visit updated.
Editing a repeating visit
When the visit is part of a repeating series, saving asks which visits to change:- This visit: only the one you opened.
- This and following visits: this one and every later one in the series.
- All visits: every visit in the series.
Quick changes from the visit sheet
- Change the team member: on the Overview tab, under Assigned to, select Assign or Change. For a visit with two team members, use Edit visit instead.
- Change the tasks: on the Tasks tab, select Edit checklist (or Add tasks). See The visit sheet on the web.
- Move it: drag it on the calendar. See Using the schedule.